DON'T GET KINDLE
IF YOU CAN POSSIBLY HELP IT, BUT IF YOU'RE STUCK WITH IT, THE FOLLOWING WILL HELP!!!
Kindle is the device for reading the books published as e-books on the Amazon.com site. It might be an okay program to use if they would just honour us with a decent set of instructions, but -- believe it or not -- Kindle doesn't come with instructions. I'm not quite sure if this is a case of arrogance or idiocy, but whichever it is, the unsuspecting customers will open the box only to find, much to their amazement, that there are no instructions. If you happen to be a technophobe like me, you may find yourself tearing a fair few hairs out before you can finally get your Kindle behaving the way a Kindle should.
To help you find your way through the Amazon-induced maze, here are a few little tips.
1. SERIAL NUMBER
Most companies which manufacture products like this put the serial number on the back of the product, which generally seems to be the logical place to put it. Not as far as Amazon is concerned, though. Amazon thinks it's more logical to put the serial number on the box, which you may in your innocence throw out. Don't. If you throw the box out you will also throw the serial number out. Without the serial number you can't register your Kindle. If you can't register it, you can't use it, so in that case you may as well throw it out and get another.
The serial number is on the bottom of the box, to the right of the "Certified Frustration Free Packaging" logo!!! (You could hardly find a more ironic logo to put on the Kindle box!!!!) It starts with FSN and consists of twelve digits, including a couple of letters of the alphabet just in case we were finding it too easy to follow. Make careful note of it!!!
2. MODEL NUMBER
The model number, unlike the serial number, is at least in the right place: on the back of the product. Unfortunately, it is so small you will literally need a magnifying glass to read it (and I kid you not). Once again, Amazon wanted to make sure things weren't getting too easy for us. Can't have these bloody customers having an easy time of it, can we???!!! Once again, make careful note of the dear little thing when you finally manage to read it.
3. BATTERY
Kindle comes with a built-in battery which you must charge fully before you can use the product. This is done by means of one of these little cords that plug into a USB port on a computer. Amazon have at least been kind enough to include the cord with the Kindle, which is more than they did with the instructions. It should take about two hours to charge your battery (don't ask me how long it will run for, but they seem to last a while). When you first turn the device on, you will probably see an icon of a battery, just to give you a hint.
4. SOME BASICS
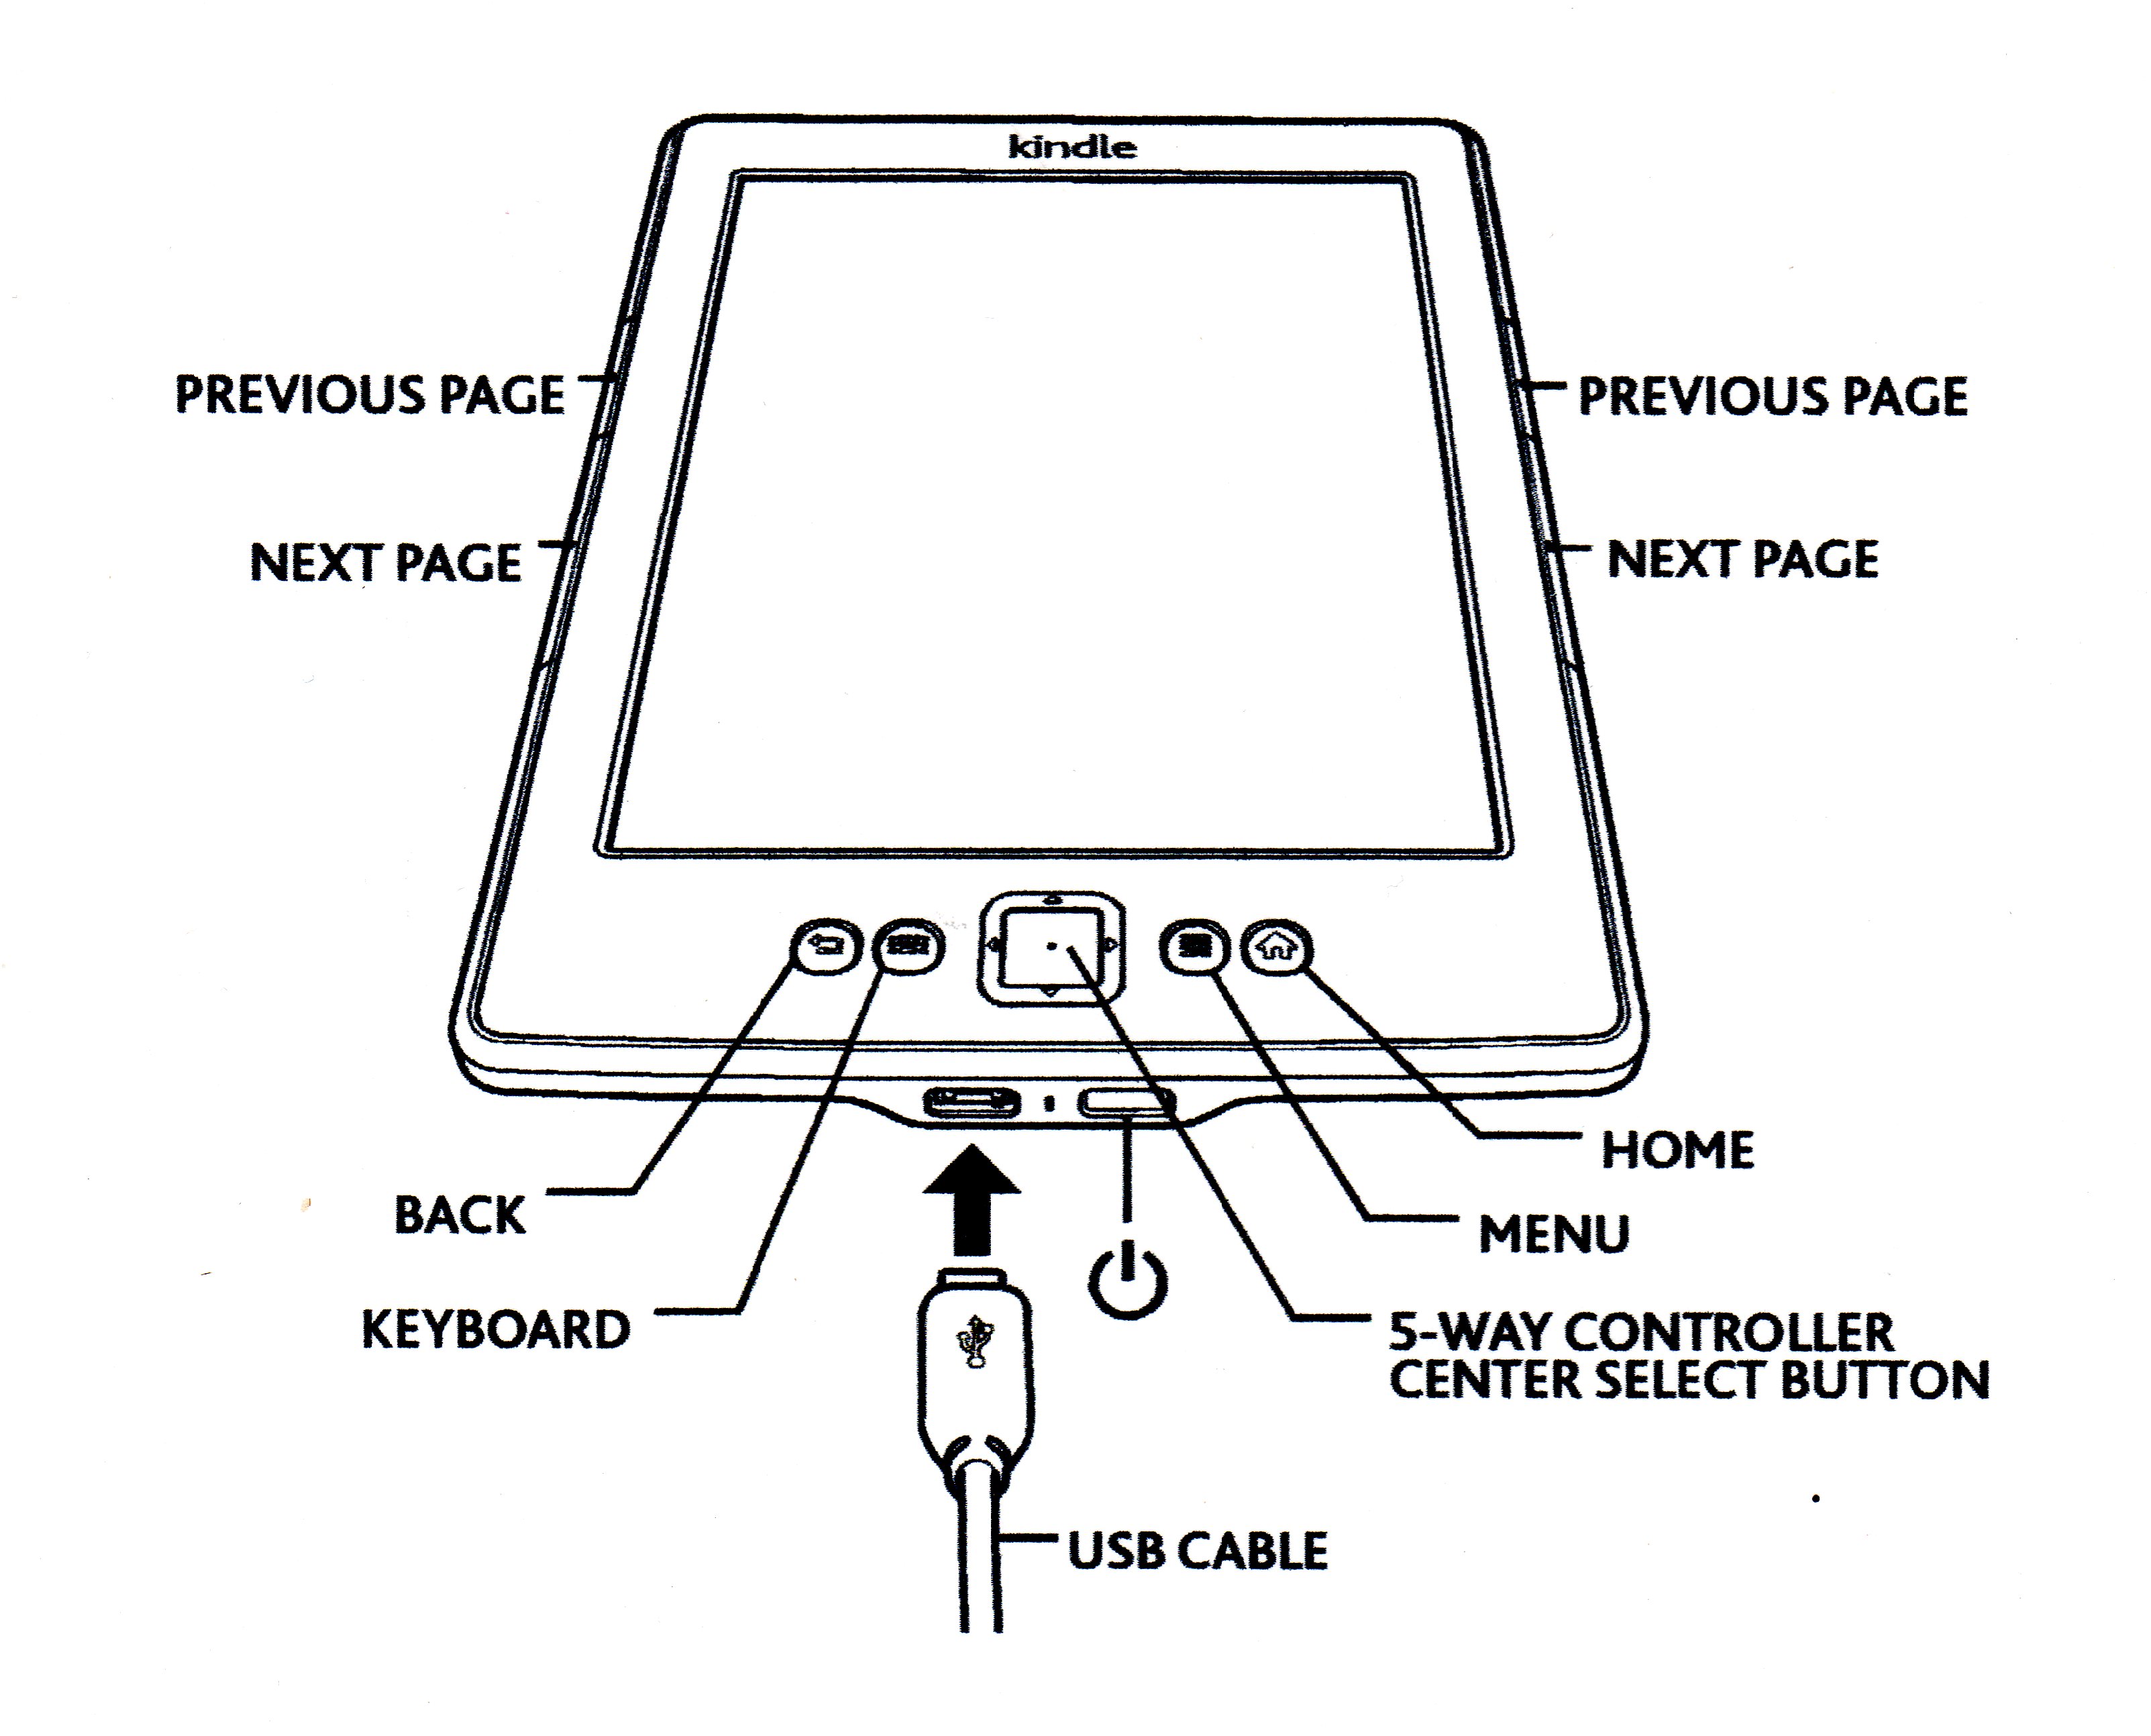
On the diagram below, note the power button on the front edge of the Kindle, to the right of the socket for the USB cord. Push it in to turn the thing on, then press the HOME button. This will show your basic home-type page-type thing, with a list of a few arcane things like dictionaries, clippings and so forth. Next, press the MENU button, which is just to the left of the Home button. This will open up a panel with various things in it, like "Shop in Kindle Store", "View Archived Items", "Search", "Settings", "Experimental" and so forth. The exact list will vary with different activities that are going on at the time, things you have done or whatever. Go up and down this list with the aid of the 5-WAY CONTROLLER CENTER SELECT BUTTON, located to the left of the MENU button. Having selected an item on the list, press the square button to make something happen with the thing you have selected. (See diagram and photos below.)
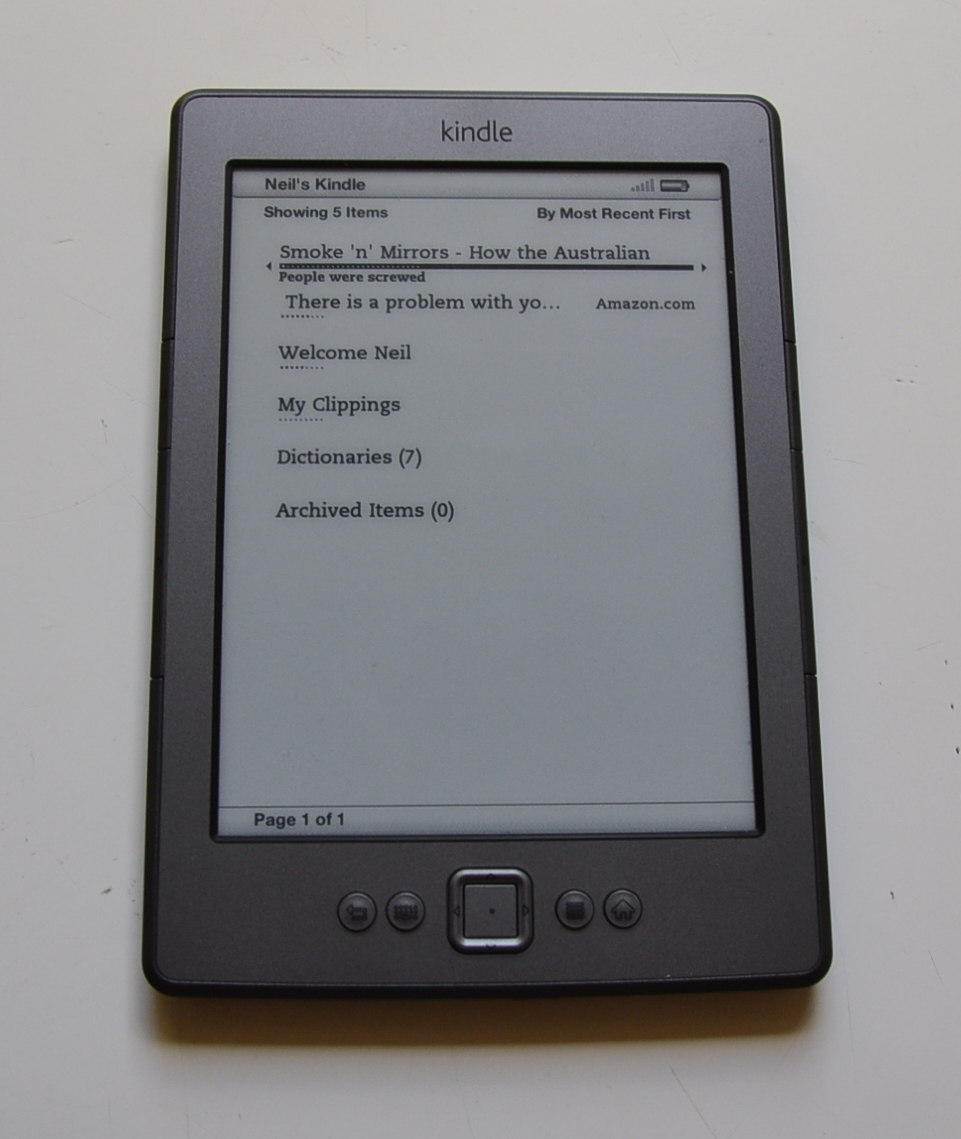
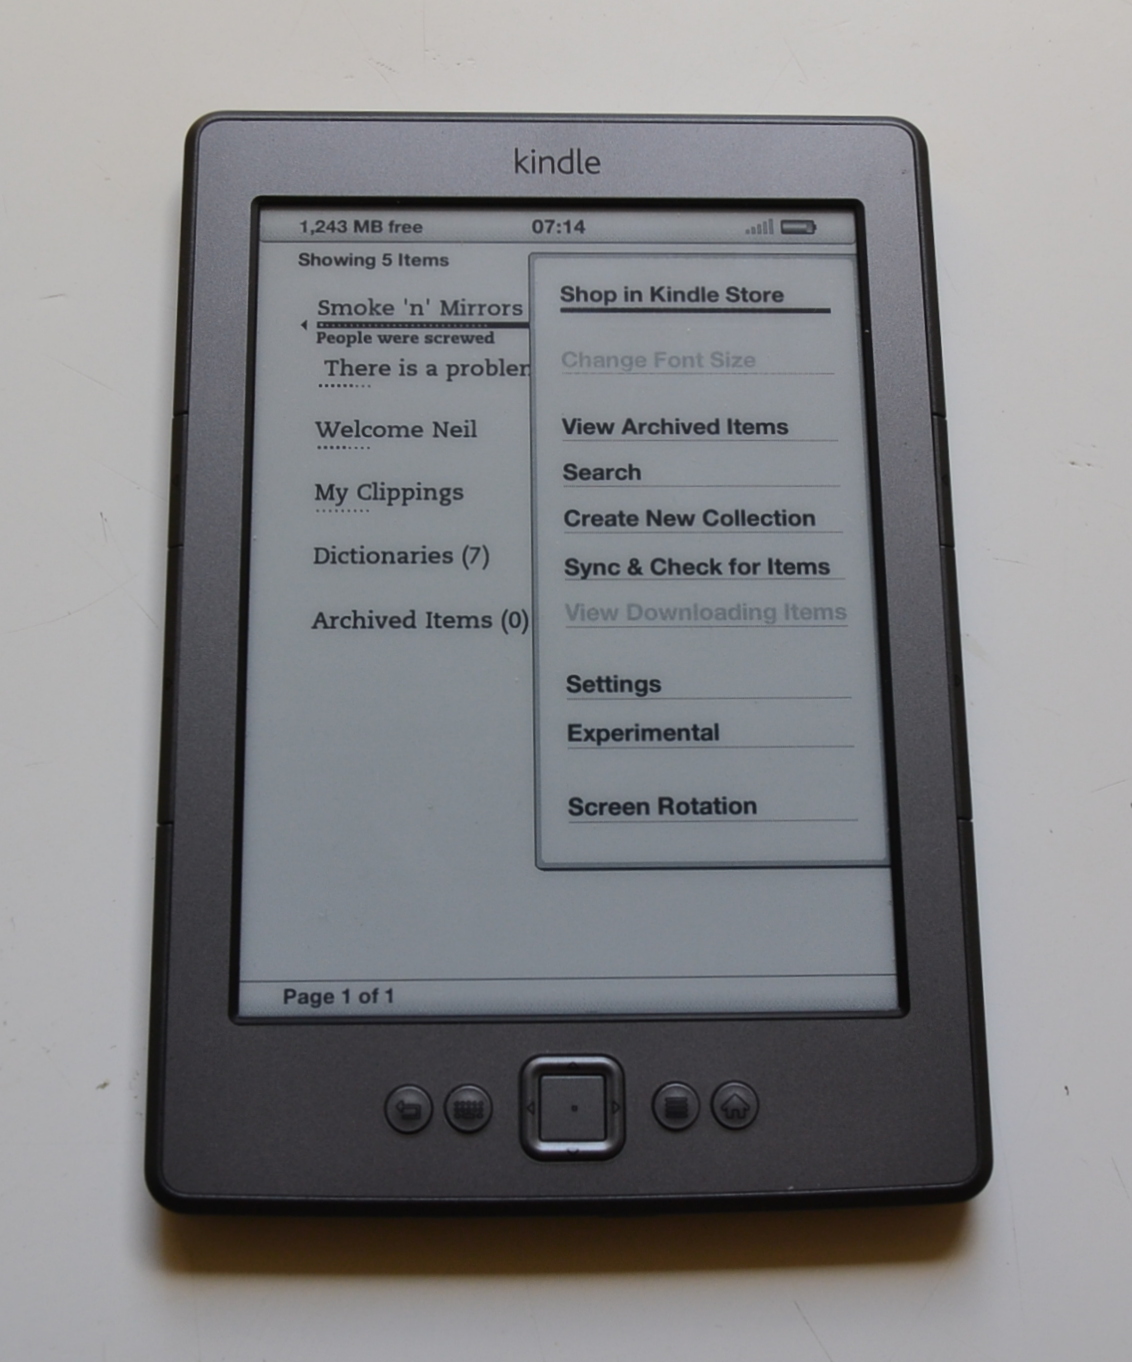
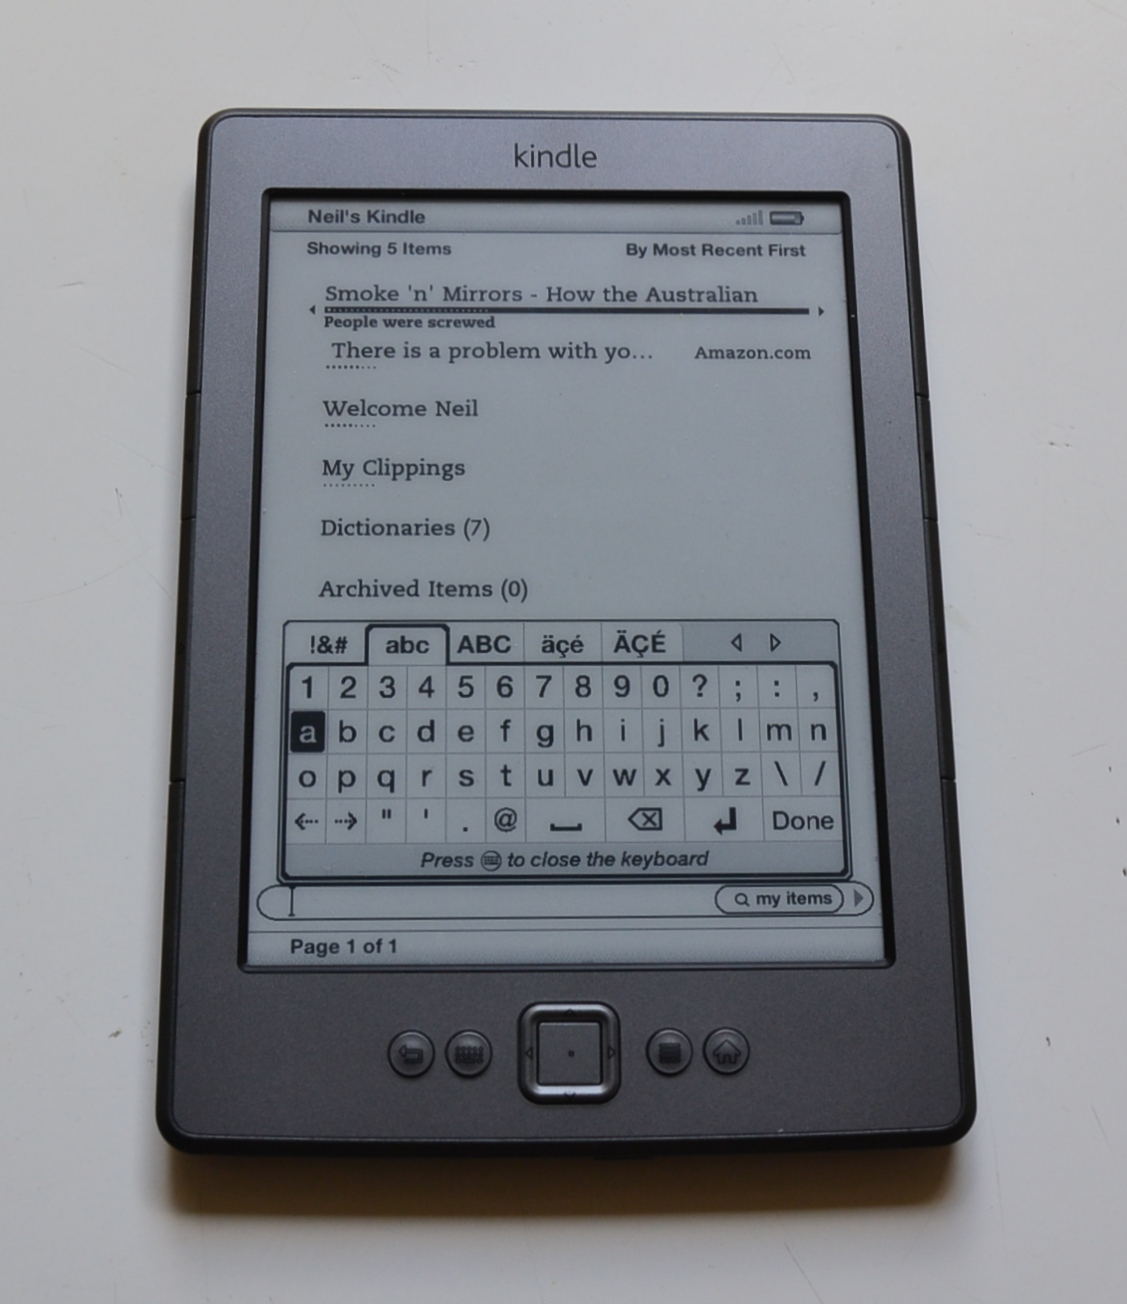
Kindle basic model. Left to right: Home Page (details will vary), Menus, Keyboard
5. CONNECTION
The first thing you will have to do with all this wizz-bang stuff is get connected via Wi-Fi. When you're in a Wi-Fi area, a bunch of options will appear on the screen and you will be able to connect with one of them. If you don't have Wi-Fi at home, you can do it on a public Wi-Fi at a library or some such place.
6. REGISTER
The next thing you have to do is register your Kindle, because you can't do a bloody thing with it until it's registered. This is why you want to be sure you're ready with the serial number and model number before you start the process (in my case, I didn't notice the serial number on the box, so it was sheer luck I didn't chuck it out, and no thanks to Amazon). Turn your Kindle on, press the HOME button, then press the MENU button. You will see "Register" in the menu panel that opens up. Select Register with the 5-way center select button and press on the square button, then pray. If you can't make head nor tail of it, you can ring Support at Amazon and do it over the phone, like I did (see link below). The way it works is that you leave your number and they ring you back. I find it's a pretty good service, providing you get someone whose accent isn't so thick as to make them unintelligible (and DON'T bother playing the race card; thick accents can be hard to follow, and this doesn't just apply to Indian accents). The first time I rang them, I got a girl whose accent was so interesting that I could only understand about one word out of every twenty, so I had communication problems on top of the tech problems. Unfortunately, it didn't occur to me to hang up and ring back in the hope of getting someone whose accent was a bit less interesting.
7. BUYING A BOOK
Once you get the system going, you select the book of your choice at Amazon, pay for it (yes, they expect you to pay for it) and proceed to magically transfer it to your Kindle. There are two ways of doing this. You can download it directly to Kindle via Wi-Fi, or you can download it to your computer and then transfer it to Kindle via the USB port. The latter is more handy if you don't have Wi-Fi at home, but it also has another advantage. If, God forbid, anything drastic happens to your Kindle, like losing it or having it stolen (not that anyone would want to steal the bloody thing), you lose the book as well as your Kindle. If, however, you have downloaded the book to your computer in the first place, the one in the computer functions as a spare copy, so you won't have to buy it again.
8. HOW TO ACTUALLY READ A BOOK ON KINDLE
Once you have a book living inside your Kindle, there are a few little pointers that will help you get through it without losing too much hair.
To start with, go to HOME and the book should be there on the list, possibly already highlighted by a black bar. If it is, press the square button in the middle of the 5-way controller, and you should find yourself at the first page of the book. (If the book is not highlighted by the black bar, scroll down the list till it is.) An alternative instead of pressing the square button is to press the little bar along the right side of the square button (the one with the arrow pointing to the right). In this case, you should find yourself at a page that is in effect the table of contents, with a list that says "Add to Collection" at the top, and then things like "Go to Last Page Read", "Go to Beginning", Go to Location..." and so forth. This may be more useful than just going straight to the first page of the book, but it's up to you.
If you just want to pick up where you left off, Kindle keeps your place for you, so when you turn it on you will automatically find yourself at the last page you were reading. Unfortunately, there are no page numbers (I speak here of the cheapest model; I don't know if some of the more expensive ones might have page numbers).
Turning the page is simply a matter of pressing one of the bars along the right and left edges of Kindle. There is a longer bar and a shorter one. The longer one has a little arrow pointing to your right; press this and you move forward to the next page. The smaller bar has a little arrow pointing to your left. Press this bar and you go back one page, for those occasions when you want to take a second look at something. Note, there are bars like this on both the left and right edges of the device, which is just for convenience; both sets of bars do the same thing.
One problem with Kindle is that there is no quick way to "fast-forward" through the book if you want to get to a page near the back; you have to do it laboriously, one page at a time. For all I know, there might be a way to do it, but I haven't found it yet (I speak as a technophobe who is just an average computer user, and there may be something I've missed).
9. SOME OTHER BASICS
There are a couple of other buttons I haven't mentioned yet, both of them located just left of the 5-way controller. The one immediately to the left of it is the Keyboard button. Press this and the keyboard pops up at the bottom of the screen. You will notice there are five options along the top of the keyboard:
(a) !&# ${ }[ ] and so on
(b) lower-case letters of the English alphabet
(c) upper-case letters of the alphabet
(d) lower-case letters with accent marks not used in English but used in other European languages
(e) upper-case letters with accent marks not used in English but used in other European languages
You move through these options by using the same bars you use to turn the pages, to get to the option you want to use.
To the left of the Keyboard button is the Back button, which you can use at any time to go back where you last were.
I think that more or less covers it, but below is a link to the fuller instructions that can be found at the Amazon site (yes, I know it's hard to believe, but they have actually provided some instructions, just not with Kindle). Their version should be more professional than mine, but it won't be as much fun.
INSTRUCTIONS AVAILABLE AT AMAZON
(have an Amazon account and sign in before going to this page)